#140 Words or Less: AnswerGarden iPad App

How do you use an iPad to get your students to brainstorm? Why not have them create a garden of words with AnswerGarden?

I have been using the original AnswerGarden website for several years as a way to stimulate thinking. If you are not familiar with the tool, students can enter up to 20 characters into an interactive word cloud (much like Wordle).


I was very excited to hear that AnswerGarden is now available for the iPad! Now you can quickly have your students brainstorm, summarize, or gather information from the confines of their iPad. Check out this free and innovative tool!

#140 Words or Less: Get Organized with Wunderlist


For this series, I want to concentrate on iPad Apps that will make your life easier and more organized in 140 words or less – of course!

Do you keep organized with lists? Then Wunderlist might be a great option. This web-based program and mobile App gives you options to stay organized, collaborate with others, and set due dates.

Easily enter tasks into Wunderlist, set due dates, create subtasks, add notes, and attach documents or pictures.

Stay organized by organizing your tasks into your own customized lists. For example, I often create lists for blog topics, books to read, school, grad school, and home.  The best part is that you can drag and drop your tasks into whichever list you choose.


Use the filtering features to see today’s tasks, this week’s task, or all of your tasks from all of your lists.


Five Google Search Tips to Make Your Life Easier

When was the last time that you had students use a paper dictionary or encyclopedia? Where do students typically turn when they can't find an answer? Google. Here are a few tips to make your life (and your student's lives) easier:

Tip 1: Quickly Define a Word
Do you ever need to define a word quickly? Where do you go? Next time this happens to you, type "define" and then your word. Google will quickly come up with a definition.

Picture
Tip 2: Search by Document Types
Do you want to find a specific type of file? For example, would you like to see if someone created a PowerPoint on the very topic you will be presenting? There are several ways to do this. One way is to:


1. Go to the Options icon
2. Choose "Advanced Search"
3. Type in keywords
4. Scroll towards the bottom of the search where you see "File Type." Choose the file type of your choice.

Tip 3: Need Help with Conversions?

Need help converting inches to centimeters? US dollars to Japanese Yen? Miles to kilometers? Type in what you want to convert. For example "miles to kilometers" and Google will provide you with a converter.


Picture
Tip 4: Readability Level

If you have various reading levels in your classroom, it may be helpful to vary your resources based on readability level. Perform your search.


1. Click Search Tools
2. Click All Results
3. Choose Readability Level


Select the reading level of your choice and Google will filter out the results.
Picture
Tip 5: Need a Calculator? 
If you ever need to quickly use a calculator, instead of searching for one, just search for "calculator." Google will provide you with a nifty-looking scientific calculator. 
Picture

PowerPoint is Dead, Use NearPod Instead?

A few weeks ago, I observed a very interesting conversation transpire. A local university was offering a three graduate course in PowerPoint. It began an interesting conversation about the whether this course was needed or not.

Don't get me wrong, I still use PowerPoint for the majority of my presentations; however, our students view this technology as "old school" and "out of date." It's the equivalent to watching a movie on VHS or listening to your favorite album on cassette. It made me think about ways that we can represent content differently without turning to PowerPoint. Is PowerPoint finally dead? Well...probably not, but this series will investigate a few "cool" alternatives.


So far, we have talked about:
The days of sitting to a presentation and soaking in all of the information are quickly coming to an end. Our students and even adults (if we are honest), want to interact with the presentation in some way. NearPod is a great tool to create the interaction we all desire on any device.

What is NearPod?

NearPod is a web-based presentation platform, which allows you to create interactive multimedia presentations. Once you have created content, it can be viewed and shared on any device. NearPod allows you to quickly gather responses, share the responses, and access response data on PDF reports.

Step 1: Create Your Content

Once you have created a free NearPod account, you can begin sifting through thousands of already created presentations or create your own. When you create your own presentation, you will have three different options (Note: some options below are paid features): 
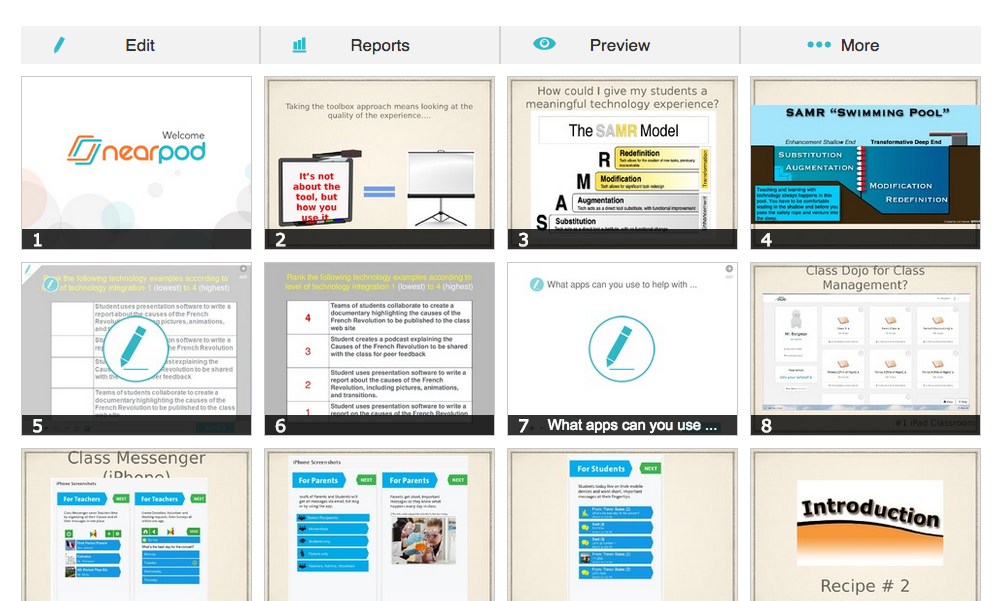
  1. Add Content in the form or pictures, PDF files, video, audio, image galleries, and Twitter feeds! You can upload already created PowerPoint slides, if you save them as PDF's or image files. 
  2. Web Content to share websites.
  3. Activities in the form of open-ended questions, polls, quizzes and drawings. This is where things get fun! I often use the drawing feature to have my students write, draw, or brainstorm their responses. One English teacher I know, uploads a picture of a paragraph and has students use the drawing features to edit grammar mistakes.
Step 2: Publish Your Presentation

Once you are finished creating your NearPod presentation, you will need to publish it. This will allow your students to be able to access it when you are ready to present.

Step 3: Go Live and Get Students to Login 

What you need to do...

When you are ready to begin presenting, you will want to open up your presentation on NearPod. You will need to choose "Live Session," which makes your presentation available for students. A five character code will be generated, which you will need to share with students. You even have the option of sharing this via social media or email.

What your students need to do...

Students need to visit www.nearpod.com or access the NearPod App on their iOS or Android device. They will need to go to Login Join Session and type the five character code, which I had mentioned above. 

Step 4: Present


Once students log into NearPod, you will be able to navigate through your slides and activities with a swipe of the screen. The best part is that everyone is on the same slide. As you advance your presentation, your student's screens advance. If a student walks in late and logs in, they will be on the same slide or activity everyone else is on. One of the best reasons why I like NearPod is the fact that you can anonymously share student responses with the class.

Step 5: Gather Data

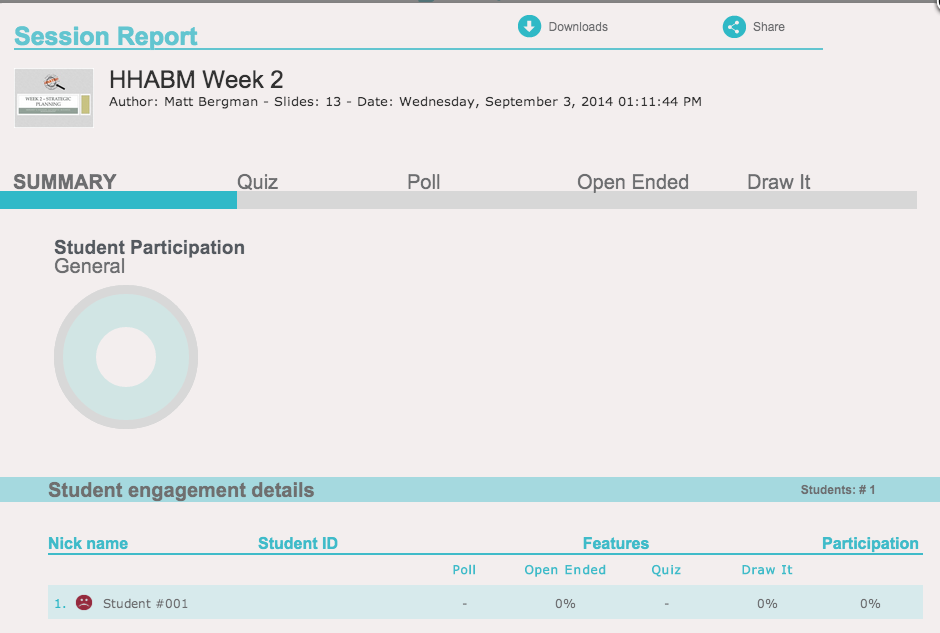
NearPod provides a detailed summary of student responses, drawings, etc. You can easily share or print this PDF report. 

Why I Love It

Not every student learns or demonstrates their understanding the same way. NearPod provides multiple ways of expressing knowledge. Its design makes it ideal for classroom management. Why? Everyone is on the same page at the same time. The paid version of NearPod does have several more bells and whistles. One of the best is the homework feature, which allows students to go through a presentation outside of the classroom and at their own pace. 

PowerPoint is Dead, Use PowToon Instead?

A few weeks ago, I observed a very interesting conversation transpire. A local university was offering a three graduate course in PowerPoint. It began an interesting conversation about the whether this course was needed or not.

Don't get me wrong, I still use PowerPoint for the majority of my presentations; however, our students view this technology as "old school" and "out of date." It's the equivalent to watching a movie on VHS or listening to your favorite album on cassette. It made me think about ways that we can represent content differently without turning to PowerPoint. Is PowerPoint finally dead? Well...probably not, but this series will investigate a few "cool" alternatives.

In our first entry, we talked about Canva. Today I would like to talk about PowToon!

What is PowToon? 

PowToon is a free presentation tool with that combines the ease and structure of PowerPoint with the "wow-factor" of iMovie and MovieMaker. Teachers can create powerful animated presentations to introduce a new topic or flip their classroom! Students can easily create presentations that take the boring out of slideshows. The best part is that PowToon now has an educational version!

How Does it Work? 

Once you have created your free account, you will be directed to your PowToon dashboard, where presentations that you have created are located. If you are ready to begin creating a new Powtoon, click "Create a New Powtoon." 

Step 1: Choose Your Template


You can edit an existing PowToon (like a template), create one from scratch, or choose from dynamic presentations or slides (coming soon!). 

Step 2: Start Working!

Once you have selected the PowToon template you would like to work with, you can begin adding content, animations, and effects. It is easy to navigate because it is set up much like PowerPoint, Google Presentations, and Keynote. This is a huge plus because it makes it easy for students to navigate and create content. 


There are several areas you should know about:

1. A toolbar appears at the top of your screen to save, copy, paste, and add other content.

2. There is a slide preview area (left-side of screen), much like other presentation softwares. This will allow you to add or delate slides, duplicate slides, or clone information. 

3. There is a My Styles area (right-side of screen), which is very much like adding clip art, pictures, animations, and other effects in other presentation softwares. I like choosing the Picto section because it provides cool animations, text effects, slide effects, props, markers, shapes and other cool elements! 

4. The bottom of your screen contains previewing tools, which will play your PowToon, so that you can see and measure its timing.  

Here's a helpful video on understanding the layout of PowToon:


Step 3: Publish

When you are ready to share your PowToon, you have two different options: 

  • Slideshow - your presentation will be uploaded to the PowToon website. Click play and you will be able to see your presentation in action! You can easily share or embed this into your website. 
  • Movie - allows you to publish your PowToon to video sites like YouTube. 


Check out PowToon and you'll find it easy to use and quite engaging! 

10 Tips for Building Better Learning Goals

Goals are not just the foundation; they are the roadmap for effectively planning a UDL lesson. They often serve as a roadmap, providing stud...